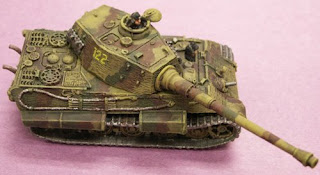
This (as seen earlier in my last post) is a Battlefront King Tiger in 15mm, painted as a favor for a gaming friend here in Moscow. All in all it is a great looking model, and it assembled well with little to no difficulties, but I do wonder if the gun is over-scale...
Anyway, after priming, the tank was basecoated in Tamiya dark yellow. I only recently learned that Tamiya paints are best thinned with alcohol or somthing like it. Not being an airbrusher, I was surprised at this detail. Nevertheless, all my usual difficulties with brushing Tamiya paints never materialized. For the camo striping I wanted to experiment with something a little darker than the Polly "olive and brown" treatment, so I went with GDW equivalents. Both were considerably darker than Polly, but in the end it worked out.
 The next step was the real experiment ... the wash. Now, having tried and failed miserably in most attempts at washing, I keep looking for the next great idea. I think I found it. "MoMini" from the Battleground Minis forum offers a jaw-dropping tutorial with a platoon of Pz IV's. His secret is a wash of artist oils in turpentine. Now, if you don't mind that pine smell, I highly recommend this method. A 20% paint solution will yield spectacular results in both toning down your basecoat as well as creating vivid depth. According to the tutorial, one just blots where you need it and the turpentine takes care of everything else. THIS is a wash that actually does what it is supposed to do. With a bit of practice a painter should get the results they are looking for.
After a liberal wash, hitting the engine deck three  separeate times and the track twice, a drybrush of Polly 'panzer dark yellow' brings the detail back out. Some handpainted turret numbers and some paint on the crew and we were good to go.
 separeate times and the track twice, a drybrush of Polly 'panzer dark yellow' brings the detail back out. Some handpainted turret numbers and some paint on the crew and we were good to go.
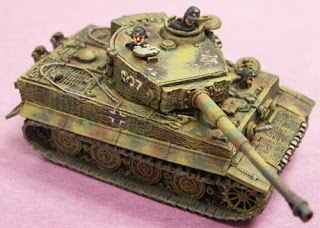
 After I got in a little practice, I turned my attention to my Tiger E, from the Wittmann kit, also by Battlefront. Honestly, since I have discoverd BF, I haven't even bothered to look anywhere else for 15mm WW2 minis.
My intention was to model "007", the Tiger Wittmann died in during the closing of the Falaise Pocket. It was his role as acting commander of SS Tiger Bn 101 that placed him in 007, and that  is how I wanted to remember him, and game him on my table. As you may have guessed, resources on 007 are few and far between. The only photo I've seen is that of the wreckage. I figured that if I kept to the general paint scheme displayed by other SS 101 Tigers, I wouldn't be too far from the mark.
 is how I wanted to remember him, and game him on my table. As you may have guessed, resources on 007 are few and far between. The only photo I've seen is that of the wreckage. I figured that if I kept to the general paint scheme displayed by other SS 101 Tigers, I wouldn't be too far from the mark.
Using nearly the same technique as the King Tiger, I based with the dark yellow, but kept to the Polly olive and brown instead of the darker GDW versions. I used a short brush, "stippling" technique for the camo. Most SS 101 Tigers had been painted in smaller blotches of green and brown, so the striping as on the KingTiger wouldn't work. After the camo the mini was hit with the wash. This time instead of a 10/10/80 black-brown-turpentine wash as with the KingTiger, I went with black. Again, heavy on the track and the engine deck. The next challange was to simulate wron paint on the turret. Again, MoMini had a great technique of using bit of the mini-packing foam. I still am in an experimental stage with this, but so far I like the results.

One way I did depart from the KingTiger was that after the wash and drybrush, I took another shage of yellow and "brightened up" the panzer yellow patches of the tank. In what amounted to a 'heavy dry-brush', the yellow portions appear more yellow than tan. Again, attention was paid to spare track, cable, pioneer tools, as well as the crew, and I must admit that I am happy with the end result.
 One thing that I am happy about (and I usually am not) is the turret numbering. I firmly believe in hand-lettering all turret and hull markings. Not that I am against decals, but I feel one has to work too hard for the results you end up with.
 Normally, my numbers tend to wander in size as they get painted, meaning, my left-most zero would be a different size than my seven. It didn't seem to happen thin time. I used 'dirty white' for the numbers, and 'dirty white' & 'tarnished black' for the national cross.
Heavy washes for the engine deck, tarnished black drybrush for the powder fouling of the muzzle brake. I went with dirty white foe the loader's hatch, and dark yellow (washed & drybrushed) for the driver's hatch.
What's next?? I need to finish Wittmann's command stand, and then a "PanzerMeyer" command stand. I'm using this opportunity to get reaquainted with SS infantry camo painting.
Stay tuned!


2 comments:
Wow - nice job!
Excellent tutorial on using washes. The next time I see you, I'll pick your brain a little.
Post a Comment