Saturday, November 29, 2008

Napoleonic Bavarian test stands...


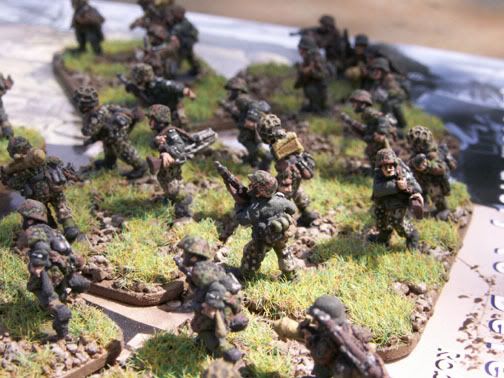
Keeping up with the Germanic theme, I'm displaying two 'test' stands of 15mm Bavarians for various Napoleonic Wars systems.


The Kingdom of Bavaria was a major ally to Napoleon's Campaigns, and a significant contributor to the Emperor's war effort. Posted today is the beginning of Napoleon's VII Corps of the 1812 Campaign into Russia.
For your approval... what we have here are Old Glory 15mm Bavarian gunners and cannon (12 lb and 6-8 lb). Soon after the two allies cemented their relationship off the field, the Bavarians made strides to become more uniform with their new friends, taking on new organizations, tactics, and even uniforms more akin to the French.


The Bavarian artillery received a complete overhaul in ordnance and organization to include, yes, French gunner's uniforms. What remained was the "Raupenhelm", sometimes called the weiner helmet, that was worn by virtually every other branch of Bavarian service.


Bavarian (French) artillery unforms consisted of the dark blue coat and pants with scarlet collars, cuff, epaulets, and turnbacks. Accrutrements and belting were all standard Bavarian issue.

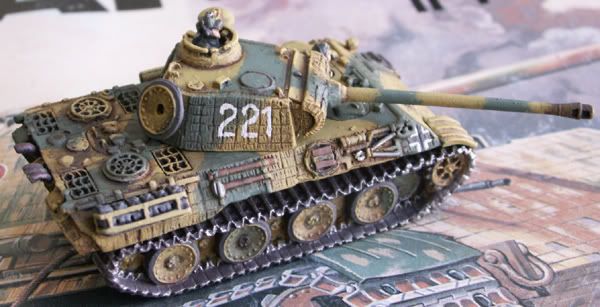
The guns were mainly 6-8 lb field peices with some occasional 12 lb guns included in various units. The guns were bronze smoothbores, and carriages of the common touble-trail design painted light gray.


The figures and guns were primed in dark-gray primer and them blackwashed for extra depth in the recesses but not necessarily darkening the highlight areas. The faces took to the brown wash very well and I was happy with most of the results. All colors were either GDW, Polly Scale, or bulk acrylics.


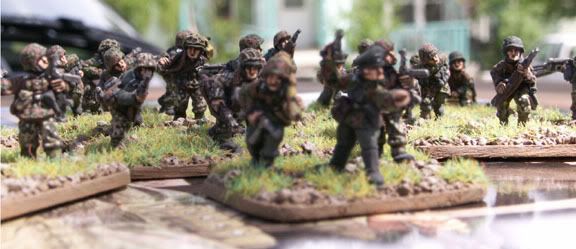
The belting and painting all the little "do-hickies" common to 19th century uniforms was tricky, but not overwhelming. All 15mm infantry have their uniform quirks. The tricky part was obtaining good, practical information concerning details and all the various colors. Painting Napoleonics is a bad time to go "FARB".


The guns were a bit of an experiment... you will need to tell me what you think. My bronze paint seems to come off a little light IMHO, so I applied brown-wash to the entire barrel before adding black-wash to the barrel bands, muzzle, and lifting hooks. This method refers to the 12lber only, I skipped the brown-wash for the 6lber.


Looking at the photos I see a good amount of detail to finish and goofs to fix. This is my first foray into Napoleonic minis (at the long behest of Scott MacPhee), and I think I've a good deal more to learn. I don't feel these are up to my standards yet, I'm sure I can do better, so consider this a work in progress. That's all for now.


Sunday, November 9, 2008

12th SS Pak-40 Platoon Project

Whew!!

I do apologize for the LOOOOOOOOONG delay between posts, but when one goes to parcel-out their day, sometimes the miniatures blog needs to take a backseat. It is NEVER a permanent backseat however, and I'm back and painting strong.

This is the first installment of my 12th SS "HitlerJugend" army for Flames of War and other 15mm games that may come my way... the all important Pak Platoon!!


This was a 7.5 cm high-velocity gun, very lightweight for its size yet quite robust in the field. This weapon was comperable in performance to what the Pz Mk IV and Stg III/IV were carrying for armament, and was quite capable of knocking-out anything the Allies had in inventory at reasonable combat ranges.

THE GUNS...


...were modeled well, but the castings had much to be desired. One gun tube was mis-cast and didn't have a muzzle brake on the end. I could chance my luck and send for a replacement part, or just model the gun as being w/o said brake. This is completely plausible as they were an assembly that screwed into the muzzle of the gun. Aside from losing a bit of projectile velocity, the gun would still be servicable. In addition to the mis-cast barrel, the lower half of the gun shield on all three models had a considerable amount of flash and 'crap' that had to be cut and filed down. This proved to be very difficult.


THE CREWS...
... were by the new sculpter at BattleFront and for the most part were ok. The prone ammo handler was a disappointment as there was little face detail. Only after a wash did any appreciable detail materialize.


THE STANDS...
... were the plastic stands that come with the pack though I HIGHLY suggest that you wash them. They are just sick with release agent and paint, glue, etc has a very rough time sticking to them. Healthy doses of railroad ballast (no kitty litter) and static grass complete the package.

I still have a bit more to do to be "completely" finished, adding silfor grass, some minor details, but in all a decent package of minis.

Monday, July 28, 2008

Tiger Project Finished...

Sorry it's been a while, but after a few weeks of travel and other distractions, the Tigers are finished. Let's discuss the King Tiger first.

This (as seen earlier in my last post) is a Battlefront King Tiger in 15mm, painted as a favor for a gaming friend here in Moscow. All in all it is a great looking model, and it assembled well with little to no difficulties, but I do wonder if the gun is over-scale...


Anyway, after priming, the tank was basecoated in Tamiya dark yellow. I only recently learned that Tamiya paints are best thinned with alcohol or somthing like it. Not being an airbrusher, I was surprised at this detail. Nevertheless, all my usual difficulties with brushing Tamiya paints never materialized. For the camo striping I wanted to experiment with something a little darker than the Polly "olive and brown" treatment, so I went with GDW equivalents. Both were considerably darker than Polly, but in the end it worked out.

The next step was the real experiment ... the wash. Now, having tried and failed miserably in most attempts at washing, I keep looking for the next great idea. I think I found it. "MoMini" from the Battleground Minis forum offers a jaw-dropping tutorial with a platoon of Pz IV's. His secret is a wash of artist oils in turpentine. Now, if you don't mind that pine smell, I highly recommend this method. A 20% paint solution will yield spectacular results in both toning down your basecoat as well as creating vivid depth. According to the tutorial, one just blots where you need it and the turpentine takes care of everything else. THIS is a wash that actually does what it is supposed to do. With a bit of practice a painter should get the results they are looking for.

After a liberal wash, hitting the engine deck three separeate times and the track twice, a drybrush of Polly 'panzer dark yellow' brings the detail back out. Some handpainted turret numbers and some paint on the crew and we were good to go.

After I got in a little practice, I turned my attention to my Tiger E, from the Wittmann kit, also by Battlefront. Honestly, since I have discoverd BF, I haven't even bothered to look anywhere else for 15mm WW2 minis.

My intention was to model "007", the Tiger Wittmann died in during the closing of the Falaise Pocket. It was his role as acting commander of SS Tiger Bn 101 that placed him in 007, and that is how I wanted to remember him, and game him on my table. As you may have guessed, resources on 007 are few and far between. The only photo I've seen is that of the wreckage. I figured that if I kept to the general paint scheme displayed by other SS 101 Tigers, I wouldn't be too far from the mark.

Using nearly the same technique as the King Tiger, I based with the dark yellow, but kept to the Polly olive and brown instead of the darker GDW versions. I used a short brush, "stippling" technique for the camo. Most SS 101 Tigers had been painted in smaller blotches of green and brown, so the striping as on the KingTiger wouldn't work. After the camo the mini was hit with the wash. This time instead of a 10/10/80 black-brown-turpentine wash as with the KingTiger, I went with black. Again, heavy on the track and the engine deck. The next challange was to simulate wron paint on the turret. Again, MoMini had a great technique of using bit of the mini-packing foam. I still am in an experimental stage with this, but so far I like the results.


One way I did depart from the KingTiger was that after the wash and drybrush, I took another shage of yellow and "brightened up" the panzer yellow patches of the tank. In what amounted to a 'heavy dry-brush', the yellow portions appear more yellow than tan. Again, attention was paid to spare track, cable, pioneer tools, as well as the crew, and I must admit that I am happy with the end result.


One thing that I am happy about (and I usually am not) is the turret numbering. I firmly believe in hand-lettering all turret and hull markings. Not that I am against decals, but I feel one has to work too hard for the results you end up with.
Normally, my numbers tend to wander in size as they get painted, meaning, my left-most zero would be a different size than my seven. It didn't seem to happen thin time. I used 'dirty white' for the numbers, and 'dirty white' & 'tarnished black' for the national cross.


Heavy washes for the engine deck, tarnished black drybrush for the powder fouling of the muzzle brake. I went with dirty white foe the loader's hatch, and dark yellow (washed & drybrushed) for the driver's hatch.

What's next?? I need to finish Wittmann's command stand, and then a "PanzerMeyer" command stand. I'm using this opportunity to get reaquainted with SS infantry camo painting.

Stay tuned!

Friday, June 20, 2008

A word about primer...

Me, I'm a black primer man. I spend my money and gaming time on historical miniatures and rules systems and have left that "fantasy crap" be. In that vein, the darker, draber, and deeper the model and mini I can make w/o going to special lengths to do so, the better!


Saying that, what is best to use? I've tried all kind of primers and and paints, and most have left me wanting. But there were some interesting experiments. In all:


DON'T USE PAINT!! Either brushed or sprayed on. It will apply WAYYYYY too thick and you will loose surface detail. They key here is to do the most, with the least in terms of priming product.


After many failed experiments, the best I have found is auto primer in an "off-black" to "darker gray".

The light in this photo gives a yellowish cast, but the results are fantanstic. Primers, as opposed to 'full-on' paint tends to apply thinner and cover better provided you don't have a heavy hand with the can.

This is "Rustoleum", in OFF-BLACK... no full black or standard gray. It kinda splits the difference between the two. I prime figs, vehicles, everything with this stuff and my results have been very satisfactory. It sells for around $5 a can, and does a great job, however, towards the end of the can, or if it has sat for a while, it can "spit" and ruin your project. Always (and this is a good rule for any product) test it first. I use a cardboard box to spray into and keep the overspary contained. A few test shots inside the box before I spray the model or fig is a good idea before I prime.

-aus

Thursday, June 19, 2008

Battlefront TIGER(s) review...

Opening salvos: Tiger 1E

My first offering with the new project is a review of both the new Battlefront sculpts of Tiger 1E and Tiger 2B (Konigstiger). I have experience in the old sculpts for both vehicles and it will be interesting to see how things have changed.

Here is an older sculpt of a Tiger 1E, late war production (see the pressed steel roadwheels). As I recall most of the "iffy" parts (fenders and mudguards) were molded either with the hull or with the track assembly. This made "extreme weathering" which I like to do rather difficult. It became a major project ot "lose" a mud guard or a fender part. BUT... one also had to glue the commander's hatch lid open. If you were to game with this model either you lost the lid rather quickly or you kept gluing it back on. Me, I chose to leave it off.


With the new latewar Tiger 1E, it comes with many crew options, an "open or closed" single-peice TC's hatch, and the entire fender assembly (front, side, and rear guards) are seperate. Now this makes the overall assemply more "fiddly" and time consuming, but the weatherin possibilities are dramatically increased!! Bravo Battlefront!!


Now, in this instance I am modeling Wittmann's "007" Tiger from his final battle keeping the northern neck of the Falaise Pockt open. Yeah, I guess just like everyone else who buys the Wittmann box. Point being, it was the batallion Commander's tank, and in these instances they are kept pristine... not all banged up and gnarly like the "line tracks". So, I gotta put it all together properly and not take liberties.

Here you can see better the entire fender assembly, and understanding I am NO master modeler, they seemed to fit together well. I will suggest that one attached the side fenders first, BEFORE the tracks. Trust me, it will be easier.


Anyway, the fenders fit well, were proportional, and in all look great. The rear fender went on very well and I was impressed. BF really seemed to put in some time on this model. The trick now will be to have the front/rear fenders on both sides symmestrical and hanging at the same angles. I do have concerns about their resilience on and off the gaming table... but only time will tell.


next, a word about primer...

Monday, June 2, 2008

SOLD pt II...

Here are some of the units I sold this last Thursday...

my "Hitlerjugend" grenadiers...


Panther A...

more grenadiers...


More to follow people...

-aus

Friday, May 30, 2008

SOLD!!!

Ahhhh, I did it, sold my German Flames of War army. Hard to part with the Panthers though.

Now I get to start all over with new sculpts and better boxed sets. I think I will let my own political qualms go and do a strictly SS army. Yes, yes I know, but they look utterly fantastic on a table.

It's a whole new project, and a whole new beginning. See it unfold.

-aus

Thursday, May 29, 2008

TIGERtanker... Front and Center!!

Well friends, I'm a 39 year-old history teacher with a life long passion for all things armored, from a Spartan helmet to the Abrams A2 tank. I've nurtured this passion as early as my pre-school days, and I remember drawing tank battles inside my Sesame Street coloring books. I've carried into my adult life as a tank crewman in First Cavalry Division in the late 80's. Now my days as a tanker are limited to the tabletop.

What will become obvious soon enough is that I am a Germanophile... and NOTHING will ever compare to the Panzer VIe "Tiger". It is pure poetry in line and form. Everything else seems to trickle down from that point. I'm very happy the Hitler regime did not survive the 1940's, but the tools at their disposal are simply intoxicating, and the manner in which they were used was brilliant.

I've been into wargaming since I got bored with chess. My first game was "Feudal", kinda like an "uber-chess on steriods". Trouble was I could not find anyone to play with. From that I graduated to "Axis and Allies" when I was in high school. In the service I fell in love with "Battletech", and in college I was talked into buying a copy of "Fire and Fury". I soon built several brigades of troops, guns, horses, etc. My expereince with WW2 gaming began with Panzerblitz. I never got into Squad Leader though, very strange... Anyway, the leap into the tabletop variations wasn't a large one. Now I find myself with a respectable German "Flames of War" army.

Wednesday, May 28, 2008

Stand to...

First off, I want to welcome you all to the Metal Militia blog, where I will share with you my current exploits in tabletop miniatures gaming, modeling, and painting.

I firmly blame my great friend Scott MacPhee for inspiring me to this "undiscovered country". I hope I can pull this off as well as he does.

What is to come? EVERYTHING to do with historical miniatures. What's wrong, what's right, and all things "between the idler wheel and drive sprocket". Let's take this march together.

next... "TIGERtanker, Front and Center!!"